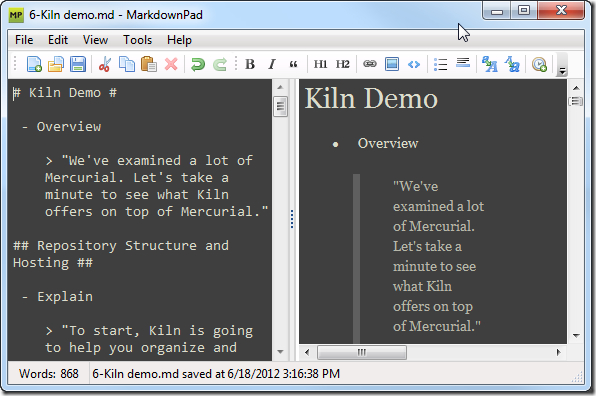
Each month, I deliver a webinar for two of our Fog Creek products, FogBugz and Kiln (speaking of, want to sign up for the webinars? Do so here: FogBugz, Kiln). To help me deliver a consistent and polished message, I’ll keep a script open in a browser window on a separate monitor. This ensures that I stay on track and mention all of the things I want to say.
To create the outline for my scripts, I use MarkdownPad on Windows, which allows me to edit my outlines using the Markdown syntax and end up with an HTML file that’s viewable in any browser.
I really like using MarkdownPad, but one of the slower parts of my workflow involves remembering to go to File > Export HTML for each of the 7 outline files that I have. I really wanted to be able to convert my Markdown files from the command line to make this faster. Since MarkdownPad doesn’t offer this command line functionality out of the box, I decided to try to add it myself. While I was there, I added some additional features to help me out while I’m doing a live webinar. Here’s a list of features I decided to implement.
- Generate HTML using Markdown source from the command line
- Use the same CSS stylesheet and other user settings that I use in MarkdownPad when I export HTML.
- Add the ability to be able to navigate header tags using the keyboard arrow keys
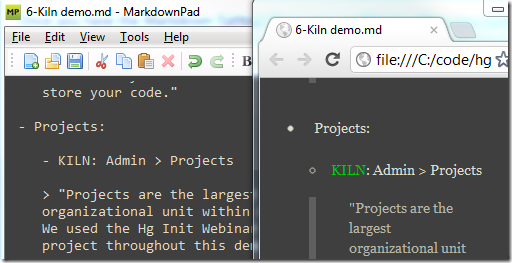
- Dynamically stylize certain key words so that they stand out. For example, if I type - KILN: in MarkdownPad, I want to be able to see - KILN: in the resulting HTML so that it stands out.
Here’s a quick screencast that shows the result of my work:
Let’s break down how I set this up.
Converting Markdown to HTML
The biggest challenge I faced, at least initially, was figuring out how to take Markdown source and convert it to HTML from the command line. I decided to try using MarkdownSharp, .NET Markdown transformation library that happens to be the same was what’s used within MarkdownPad. Since you can easily call .NET classes from PowerShell, I figured this would be a relatively simple implementation, which was indeed the case:
[sourcecode language="powershell"] PS C:\> Import-Module MarkdownSharp.dll PS C:\> $m = New-Object MarkdownSharp.Markdown PS C:\> $m.Transform("- This is a bullet point") <ul> <li>This is a bullet point</li> </ul> [/sourcecode]
The actual implementation was a bit trickier, but still relatively straightforward. I created a function in my Powershell Profile called Markdown-ToHtml. It will take either a file name or plain text and also lets you specify standard options for MarkdownSharp. Notice how I’m importing MarkdownSharp.dll, which is stored in a lib directory right within my Powershell profile. I think I built the file from source code, but feel free to grab my compiled version here (click the Download link on the right side of the page).
[sourcecode language="powershell"] Import-Module .\lib\MarkdownSharp.dll function Markdown-ToHtml($item, $AutoHyperlink = $False, $AutoNewLines = $False, $LinkEmails = $False, $EncodeProblemUrlCharacters = $False){ $mo = New-Object MarkdownSharp.MarkdownOptions $mo.AutoHyperlink = $AutoHyperlink $mo.AutoNewLines = $AutoNewLines $mo.LinkEmails = $LinkEmails $mo.EncodeProblemUrlCharacters = $EncodeProblemUrlCharacters $m = New-Object MarkdownSharp.Markdown($mo) $toTransform = "" if (($item.GetType().Name -eq "FileInfo") -or (Test-Path $item -ErrorAction SilentlyContinue)) { $toTransform = (Get-Content $item) $toTransform = [string]::join("`r`n",$toTransform) } elseif ($item.GetType().Name -eq "String") { $toTransform = $item } else { # I don't know what to do with this } return $m.Transform($toTransform) } [/sourcecode]
Once you have the Markdown-ToHtml file in your profile (or within your build script; either way is fine), the next step is to grab MarkdownPad’s settings so our generated HTML is consistent with what you see in MarkdownPad.
Find MarkdownPad’s Settings
MarkdownPad is a ClickOnce application, so it’s settings are stored in a user.config file in a seemingly random folder in the user’s AppData directory. Thankfully, we can use a little Powershell Magic to make sure we get the correct file:
[sourcecode language="powershell"] PS C:\> ls $env:APPDATA\..\Local\Apps\2.0 -r -include user.config | %{if(cat $_ | ss "MarkdownPad" -quiet){return $_;}} | select -first 1
Directory: C:\Users\benm\AppData\Local\Apps\2.0\Data\0CZN9Q11.JVM\MNOR0348.10M\mark..tion_12329825c85e214b_0001.0003_8873814a9315382c\Data\1.3.1.1
Mode LastWriteTime Length Name ---- ------------- ------ ---- -a--- 6/18/2012 3:02 PM 10492 user.config [/sourcecode]
Reading the XML file is also pretty simple:
[sourcecode language="powershell"] #Get the MarkdownPad config file $configFile = ls $env:APPDATA\..\Local\Apps\2.0 -r -include user.config | %{if(cat $_ | ss "MarkdownPad" -quiet){return $_;}} | select -first 1 #Parse the config file as XML, pulling out appropriate values [xml]$doc = Get-Content $configFile $Css = $doc.SelectSingleNode("/configuration/userSettings/MarkdownPad.Properties.Settings/setting[@name='HTML_CustomStylesheetSource']").Value $AutoHyperlink = [System.Convert]::ToBoolean($doc.SelectSingleNode("/configuration/userSettings/MarkdownPad.Properties.Settings/setting[@name='Markdown_AutoHyperlink']").Value) $AutoNewLines = [System.Convert]::ToBoolean($doc.SelectSingleNode("/configuration/userSettings/MarkdownPad.Properties.Settings/setting[@name='Markdown_AutoNewLines']").Value) $LinkEmails = $False $EncodeProblemUrlCharacters = [System.Convert]::ToBoolean($doc.SelectSingleNode("/configuration/userSettings/MarkdownPad.Properties.Settings/setting[@name='Markdown_EncodeProblemUrlCharacters']").Value) [/sourcecode]
We’ll use these settings later when we put together the complete build script.
Navigate HTML Headers Using Arrow Keys
I wanted to be able to use the arrow keys to navigate my outline files during the live webinar. I decided to include jQuery in my generated files and I ended up finding a cool library called jQuery.ScrollTo, which is included in my build script.
To wire up the ScrollTo plugin to keyboard commands, I used the following script, called scrollToArrow.js:
[sourcecode language="javascript"] (function($){ $(window).keyup(function(e){ window.ixTag = window.ixTag || 0; tagsH = $('h1,h2,h3,h4,h5'); var key = e.which | e.keyCode; if(key === 37){ // 37 is left arrow window.ixTag = window.ixTag - 1 < 0 ? 0 : window.ixTag - 1 console.log('left'); } else if(key === 39){ // 39 is right arrow window.ixTag = window.ixTag + 1 >= tagsH.length ? tagsH.length - 1 : window.ixTag + 1 console.log('right'); } $.scrollTo($(tagsH[window.ixTag]),{duration:250}); }); })(jQuery); [/sourcecode]
It’s a bit hacky, but it does the job.
Dynamically Stylize Keywords
The next challenge was to add styling to the resulting HTML page for certain keywords so that they would jump out to me during the webinar.
I had originally solved this using a PowerShell script to modify the original Markdown file, but I decided to use some javascript instead so that the original Markdown file isn’t littered with <span> tags. Here’s what the addStyles.js file looks like:
[sourcecode language="javascript"] $(document).ready(function(){ var toMatch = /^(PP|FB|PS|VS|KILN|NP|EXPLORER|THG):/i; var matches = $('p,li').filter(function(){ return $(this).html().match(toMatch); });
$(matches).each(function() { var html = $(this).html(); console.log(html); var match = html.match(toMatch)[1]; var replaceWith = html.replace(toMatch, '<span class="' + match + '">' + match + '</span>:'); //console.log(replaceWith); $(this).html(replaceWith); }); }); [/sourcecode]
Bringing It All Together into A Build Script
I use all of the above elements—putting Markdown-ToHtml in my profile, parsing the user config, the javascript files—to put together a simple build script. In short, the script will look for all Markdown files (.md) in the directory and then output the HTML to a folder called outline-html. The javascript files and the exported CSS are also placed in outline-html. Here is build.ps1:
[sourcecode language="powershell"] #Get the MarkdownPad config file $configFile = ls $env:APPDATA\..\Local\Apps\2.0 -r -include user.config | %{if(cat $_ | ss "MarkdownPad" -quiet){return $_;}} | select -first 1 #Parse the config file as XML, pulling out appropriate values [xml]$doc = Get-Content $configFile $Css = $doc.SelectSingleNode("/configuration/userSettings/MarkdownPad.Properties.Settings/setting[@name='HTML_CustomStylesheetSource']").Value $AutoHyperlink = [System.Convert]::ToBoolean($doc.SelectSingleNode("/configuration/userSettings/MarkdownPad.Properties.Settings/setting[@name='Markdown_AutoHyperlink']").Value) $AutoNewLines = [System.Convert]::ToBoolean($doc.SelectSingleNode("/configuration/userSettings/MarkdownPad.Properties.Settings/setting[@name='Markdown_AutoNewLines']").Value) $LinkEmails = $False $EncodeProblemUrlCharacters = [System.Convert]::ToBoolean($doc.SelectSingleNode("/configuration/userSettings/MarkdownPad.Properties.Settings/setting[@name='Markdown_EncodeProblemUrlCharacters']").Value)
#put the CSS in its own file $Css | out-file .\outline-html\markdownStyle.css -encoding "UTF8"
#for each Markdown file in the directory: # 1. use MarkdownSharp to convert the markdown to the HTML body # 2. build the full HTML file, adding in CSS and javascript references in the header # 3. create the file in outline-html $files = ls *.md | %{$_.Name}
$files | foreach { $htmlBody = Markdown-ToHtml $_ -AutoHyperlink $AutoHyperlink -AutoNewLines $AutoNewLines -LinkEmails $LinkEmails -EncodeProblemUrlCharacters $EncodeProblemUrlCharacters $sb = New-Object System.Text.StringBuilder [void]$sb.AppendLine('<!DOCTYPE html PUBLIC "-//W3C//DTD XHTML 1.0 Transitional//EN" "http://www.w3.org/TR/xhtml1/DTD/xhtml1-transitional.dtd">') [void]$sb.AppendLine('<html xmlns="http://www.w3.org/1999/xhtml" xml:lang="en" lang="en">') [void]$sb.AppendLine('<script src="https://ajax.googleapis.com/ajax/libs/jquery/1.7.2/jquery.min.js"></script>') [void]$sb.AppendLine('<script src="jquery.scrollTo.js"></script>') [void]$sb.AppendLine('<script src="scrollToArrows.js"></script>') [void]$sb.AppendLine('<script src="addStyles.js"></script>') [void]$sb.AppendLine('<link rel="stylesheet" type="text/css" href="markdownStyle.css">') [void]$sb.AppendLine('<head>') [void]$sb.AppendLine("<title>$_</title>") [void]$sb.AppendLine('<meta http-equiv="Content-Type" content="text/html; charset=utf-8" />') [void]$sb.AppendLine('</head>') [void]$sb.AppendLine('<body>') [void]$sb.AppendLine($htmlBody) [void]$sb.AppendLine('</body>') $htmlFileName = (($_ -split ".md")[0]) + ".html" $sb.ToString() | out-file ".\outline-html\$htmlFileName" -Encoding "UTF8" } [/sourcecode]
Once you have build.ps1, you can run it from the command line using .\build.ps1, which will generate HTML files for all markdown files in the current directory.

